[Check Latest Arrivals paint pad applicator on Amazon.]
# Paint Pad Applicators: Get Flawless Walls 5x Faster (2026 Guide)
Are you tired of spending hours painting, only to end up with streaks, uneven coverage, and aching arms? Do you dream of perfectly smooth walls without the hassle and mess of traditional rollers and brushes? Then you’re in the right place! This guide will walk you through the world of paint pad applicators, incredible tools that can cut your painting time by up to 5x and deliver flawless, professional-looking results. Get ready to transform your painting experience!
[Explore Top Rated paint pad applicator on Amazon.]
## The Secret to Faster, Flawless Painting
Why are so many homeowners and professional painters making the switch to paint pad applicators? It’s simple: they offer a superior combination of speed, ease of use, and quality finish. Unlike rollers and brushes, paint pads distribute paint evenly across the surface, eliminating streaks and providing exceptional coverage in fewer coats. They’re also much easier to maneuver in tight spaces and around corners. Ready to ditch the frustration and upgrade your painting game? Let’s dive in!
[Explore Top Rated paint pad applicator on Amazon.]
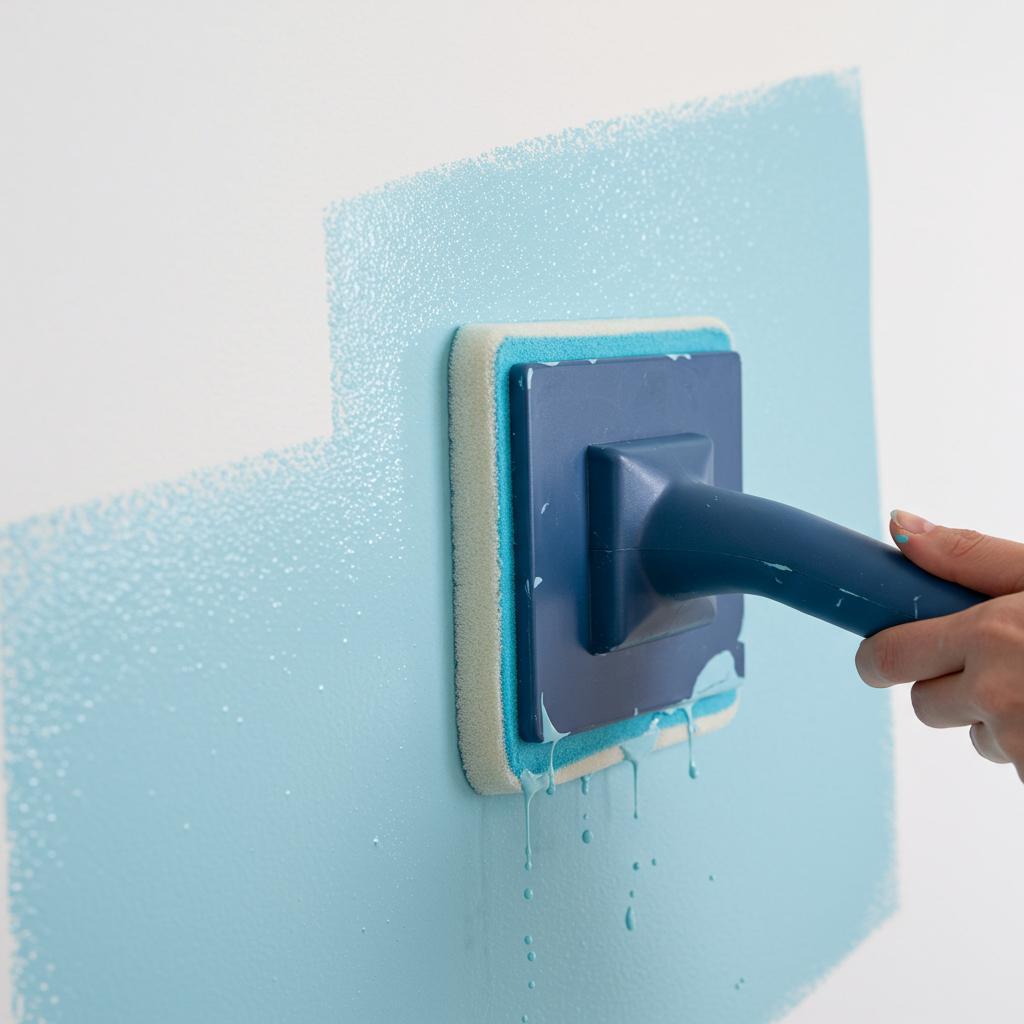
## Step-by-Step Guide to Using a Paint Pad Applicator
Using a paint pad applicator is incredibly straightforward. Follow these simple steps to achieve professional-quality results in record time:
### Step 1: Prepare Your Surface
As with any painting project, preparation is key. Start by cleaning the walls with a damp cloth to remove any dust, dirt, or grime. Fill any holes or cracks with spackle or joint compound and let it dry completely. Sand the repaired areas smooth and wipe away any sanding dust. Finally, tape off any trim, windows, or door frames with painter’s tape to protect them from stray paint.
### Step 2: Prime the Walls (If Necessary)
If you’re painting over a dark color, a glossy surface, or bare drywall, priming is essential. Apply a coat of high-quality primer using your paint pad applicator, just as you would with paint. Allow the primer to dry completely according to the manufacturer’s instructions. Priming ensures better adhesion of the paint and helps achieve a uniform finish.
### Step 3: Load the Paint Pad
Pour a small amount of paint into a paint tray. Dip the paint pad applicator into the paint, ensuring that the entire pad is evenly saturated but not dripping. Avoid overloading the pad with paint, as this can lead to drips and uneven coverage. Some paint pad applicators come with their own trays for easier loading.
### Step 4: Apply the Paint
Starting at the top of the wall, gently press the paint pad applicator against the surface and begin painting in smooth, overlapping strokes. Work in small sections, applying even pressure to ensure consistent coverage. Avoid pressing too hard, as this can cause the paint to squeeze out and create drips. If you’re using an extension pole, make sure to adjust your grip for optimal control.
### Step 5: Maintain a Wet Edge
To prevent lap marks, always maintain a “wet edge,” meaning that you should overlap each stroke slightly with the previous one while the paint is still wet. This helps to blend the paint together seamlessly and create a flawless finish. Work quickly and efficiently to avoid letting the paint dry before overlapping.
### Step 6: Tackle Corners and Edges
Paint pad applicators are excellent for getting into corners and edges, but you can also use a small brush for those intricate areas. For sharp, clean lines, use painter’s tape to mask off the edges before painting. Apply a thin coat of paint along the taped edge and let it dry slightly before applying a second coat. Gently remove the tape while the paint is still slightly wet to prevent peeling.
### Step 7: Apply Additional Coats (If Necessary)
Depending on the color and opacity of your paint, you may need to apply a second or even a third coat to achieve full coverage. Allow each coat to dry completely before applying the next. Lightly sand between coats with fine-grit sandpaper for an ultra-smooth finish.
### Step 8: Clean Up
Once you’ve finished painting, remove the painter’s tape while the paint is still slightly wet. Clean your paint pad applicator immediately with warm water and soap. Rinse thoroughly and allow it to dry completely before storing. Proper maintenance will extend the life of your paint pad applicator and ensure optimal performance for future painting projects.
[Explore Top Rated paint pad applicator on Amazon.]
## Tools for the Job: The Best Paint Pad Applicators and Accessories
To truly maximize the benefits of using a paint pad applicator, consider investing in high-quality tools and accessories. Here are a couple of recommendations:
* **Wagner Smart Edge Roller:** While technically called a roller, this tool functions very similarly to a paint pad and creates streak-free corners and trim work. Its innovative design allows for precise application, saving you time and effort. The Wagner Smart Edge Roller is perfect for DIYers and professionals alike. Its key features include adjustable paint flow and an ergonomic handle for comfortable use. This tool minimizes the need for taping, making paint jobs quicker and easier.
* **Wooster Brush Pelican Pail:** This handy pail keeps your paint close at hand and prevents spills. Its built-in roller grid makes loading your paint pad applicator quick and easy and its convenient handle makes it portable around the room. The Wooster Brush Pelican Pail is made from durable plastic and is easy to clean. This product is an essential addition to any paint job.
[Explore Top Rated paint pad applicator on Amazon.]
## Pro Tips & FAQs for Paint Pad Perfection
Here are some pro tips and answers to frequently asked questions to help you get the most out of your paint pad applicator:
* **Don’t Overload the Pad:** As mentioned earlier, avoid overloading the pad with paint. This is a common mistake that can lead to drips and uneven coverage. Start with a small amount of paint and gradually add more as needed.
* **Use the Right Pad for the Job:** Paint pad applicators come in different sizes and materials. Choose the right pad for the type of surface you’re painting. For example, a thicker pad is better for textured walls, while a thinner pad is ideal for smooth surfaces.
* **Clean the Pad Regularly:** During long painting sessions, clean the paint pad applicator regularly to prevent the paint from drying and clogging the pad. Simply rinse it with water and squeeze out any excess.
* **Store the Pad Properly:** When you’re not using the paint pad applicator, store it in a plastic bag or airtight container to prevent it from drying out.
**FAQ: Are paint pad applicators suitable for all types of paint?**
While paint pad applicators can be used with most types of paint, they are best suited for latex and acrylic paints. Avoid using them with oil-based paints.
**FAQ: Can I use a paint pad applicator on ceilings?**
Yes, you can use a paint pad applicator on ceilings, but it’s important to use an extension pole to reach high areas safely. Choose a lightweight paint pad applicator to minimize strain on your arms and shoulders.
**FAQ: How do I prevent lap marks when using a paint pad applicator?**
To prevent lap marks, always maintain a wet edge and overlap each stroke slightly with the previous one while the paint is still wet. Work quickly and efficiently to avoid letting the paint dry before overlapping.
[Explore Top Rated paint pad applicator on Amazon.]
## Final Verdict: Embrace the Paint Pad Revolution
Paint pad applicators truly offer a faster, easier, and more efficient way to achieve flawless walls. By following the steps and tips outlined in this guide, you can transform your painting experience and achieve professional-looking results in a fraction of the time. So, ditch the rollers and brushes and embrace the paint pad revolution! You’ll be amazed at how much faster and easier painting can be.
Now you’re armed with the knowledge to confidently tackle your next painting project. Get ready to enjoy beautifully painted walls with minimal effort and maximum impact!
[Shop Budget-Friendly paint pad applicator on Amazon.]
